How To Set Up BOS For Your Company (Company Settings)
You already setup some basic company details when you signed up. In this tutorial, we will take you through every step of configuring your advanced company settings in BOS.
It is important to set up all your Company Settings, because this will tell BOS how to handle more complicated tasks such as invoicing, auto-pay and auto-book.
Navigate to Company Settings > Details. On this page, you'll be able to edit:
Company Details
This is where you specify your company details that get applied to your client invoices and musician invoices. Add your company logo and even set your fiscal year start date so your financial reports can be accurate to your bookkeeping cycle.

Company Administrators
Add as many administrators as you'd like to your company. Administrators have can edit your company details and all your booking data and clients as well as invite new members to your company.

Permission Levels
Company Owner Level
There is only one owner for each company. This is the person who creates the company inside Back On Stage. There is no way to re-assign company ownership to anyone else, so make sure you set your company up properly, the first time.
If you want to transfer ownership to someone else, your only option is to change your personal profile to the new owner's details, meaning that any other companies that your personal account is connected to, will now be connected to them. As you can imagine, this is not ideal in most situations.
Company Owners have full company permissions as Full Admins do. However, only the company owner has permission to delete the company.
Company Admins
Next, in the Company Administrators settings, BOS gives you the ability to invite your teammates to help out with the administration tasks. There are two types of system admins: Full Admin and Limited Admin.
- Full Admins
Have the same permissions as the owner of the company, including moving money and creating financial transactions, but they cannot delete the company.
- Limited Admins
Have the following limitations: - Cannot view or edit company PayPal Settings
- Cannot edit company Auto-Pay Settings in Company Details (read only)
- Cannot send or record payments to members from the Finances Tab inside an Individual Booking View (read only)
- Cannot edit Auto-Pay checkboxes inside Finances Tab in the Individual Booking View (read only)
- Cannot edit expense transactions inside the Finances Tab in the Individual Booking View
Musician Permission Levels
Musician and staff members, known in Back On Stage as “Members” are addressed in the Members section of the app. But as for what permissions they have, Member accounts can access booking data important to them, but only for the bookings they have been booked for. They can also access the band's repertoire and setlists anytime.
Don’t worry, they won’t see any sensitive information like client contact details, contracts, invoices or fees collected, or what other members are being paid.
There’s more on Member permissions in the section on Adding New Members.
Company Taxes
If your company charges taxes for services it renders, you can add your tax registration number, tax name (label) and tax percentage here. You can select to have this tax automatically applied to services when you create invoices to charge your clients for gigs.

Client Invoice Settings
By adjusting these invoice settings you will define the parameters for outgoing invoices, deposit options and invoicing timeline. It’s fairly straight forward, but important nonetheless. By default, we set the due date for the invoice balance to the date of the booking, unless you specify a new default due date here.

Company Currency
Choose your company currency here. This is very important. If you elect to connect your business PayPal account so that you can accept client payments via PayPal or credit card, or so that you can send payouts to musicians via PayPal, this is the currency that those transactions will be processed in.
Each company can only operate in one currency at a time.

If you need to bill clients in other currencies, you can create more companies by selecting "Add New" from your Company List dropdown menu and setting those companies to other currencies.

PayPal Settings
Setting up PayPal for your company will enable you to accept credit and debit card payments from your clients and pay your musicians too. This really is the one-stop money-moving tool you’ve been waiting for.
To get started, navigate to PayPal settings inside Company Settings > Details.
Here, we will connect your BOS account to PayPal, letting you accept online payments from your clients and pay your band members through secure PayPal transfers.
**To link your PayPal account to Back On Stage, you will need to first obtain a PayPal Business Account.
It is important to remember that your clients do not need PayPal accounts to send you credit card payments, but your band members will need their own PayPal accounts to receive payouts.
Link Your PayPal Account to Back On Stage
Follow these instructions to link your PayPal Business account to Back On Stage:
- Sign up for a PayPal Business Account at PayPal.com. You will also need to "Confirm Your Email" (PayPal will send you an email with a link you need to click) and you will need to get verified. To get verified, link your checking account (at your physical bank) to your PayPal account.
- Next, go to developer.paypal.com and login with your new PayPal business account credentials
- Navigate to the Dashboard (click on your name in the top-right, then choose "Dashboard")

- Click on “Live”, under ‘My Apps & Credentials,’ then click on “Create App”


- Give your app a name like “Back On Stage” so you can identify it. Then, click “Create App”

- On the next screen, click on the name of your new app to open it

- Copy the text you see inside the "Client ID" field and paste it inside your PayPal Settings area

- Click on "Show" under 'Client Secret' then paste that text into your PayPal Settings area

- Activate your PayPal integration inside Back On Stage by ticking the "Enable PayPal" checkbox and then "Update Details" to save
- Check your currencies: make sure that your company currency inside Back On Stage and your "Primary" currency inside PayPal are the same

- Fund your PayPal account: if you wish to use PayPal to send payouts to pay musicians inside Back On Stage, your PayPal balance must be sufficient to cover any payout amounts.

If you see any errors inside Back On Stage, please double check that you have copied the Client ID and Secret into the right boxes and that they match exactly.
PayPal Master Switch
Also located inside the PayPal Settings area is your PayPal master switch. Using this, you can enable or disable PayPal capabilities across your entire company. If this is disabled, clients will not be able to pay you via Credit Card, Debit Card or PayPal and you won't be able to pay your musicians with PayPal or Auto-Pay either.

Just toggle the checkbox on or off as you need, and click the “Update Details” button.
What about PayPal fees?
Depending on where you are located and where you are accepting payments from or sending payouts to, PayPal charges fees for all transactions. We did lots of research before settling on PayPal as our main money tool, and believe us, you won’t find better rates out there.
Back On Stage is integrated with two different arms of PayPal, which are important to understand so you can understand the fees you’ll pay when receiving or sending money:
Receiving Money with PayPal Payments Standard
To accept client payments on your invoices, either via debit card, credit card or PayPal, you will pay a fee to PayPal equal to a small percentage of the transaction amount plus a small transaction charge.
To find out what the PayPal Merchant Fees are for PayPal Payments Standard in your area, just do a Google search for “PayPal Payments Standard Fees” and you should find what you need.
To give you an example, these are the fees in Canada:
- a fee of 2.9% of the transaction amount plus a fixed fee based on the currency
Sending Money with PayPal Payouts and Mass Pay
To send money to your musicians, Back On Stage uses the PayPal Payouts and Mass Pay integration. You don’t really need to know what that means, but in case you want to look it up, there you go!
Sending money is MUCH cheaper than receiving it. Not sure why, but we’re just glad PayPal cut us a break somewhere!
In short, transaction fees for sending individual payouts to musicians and staff are usually less than half a dollar. Again, this will depend on where you are located, as PayPal fees vary across countries.
To read more about fees associated with paying your musicians and staff inside Back On Stage, skip to the “ PayPal Fees for Paying Musicians” section below.
Musician Auto-Pay & Payout Settings
You can completely automate the prcoess of paying your musicians using Auto-Pay. Setting up Auto-Pay for your bookings is a 5 step process:
- Connect Your PayPal Account To BOS
- Enable The Auto-Pay Master Switch
- Configure Auto-Pay Settings
- Configure Invoice Recipient Settings
- Activate Auto-Pay Checkboxes Inside Individual Bookings
After you have set up Auto-Pay (steps 1-4), you will only need to do step 5 to continue using Auto-Pay for future bookings.
1. Connect Your PayPal Account
Scroll up on this page to see how to connect your PayPal business account to Back On Stage.
2. Enable The Auto-Pay Master Switch
If you already connected your PayPal account earlier, you can go ahead and activate the Auto-Pay master switch by checking the checkbox. This will activate the Auto-Pay system, giving you (admins) the option to select if individual musicians within individual gigs will be paid automatically at the time you set below.

3. Configure Auto-Pay Settings
Now specify the time at which you want to send auto-pay payouts by filling in the Auto-Pay Settings:
NOTE: The time selector is in military time (24 hour clock). Select the HOUR first and then the MINUTE.
Auto-Pay sends musician payouts via PayPal only. If you have not connected your PayPal account, Auto-Pay cannot function.
4. Configure Payout Invoice Recipient Settings
You can choose who will receive an email notification containing an attached PDF invoice each time Auto-Pay complates a payment to a musician.

We recommend you at least send the musician a copy of their invoice so they know they have been paid. PayPal will also send them a notification email, but your invoice email will clarify what gig the payout belongs to.
Here's a sample of an auto-generated invoice:

If you need to send copies of invoices to your accountant or accounting software, you can easily do that by entering any additonal email addresses in the "Send invoices to additional addresses" field. You can add as many emails as you like. Just separate them with commas.
5. Activate Auto-Pay Checkboxes Inside Individual Bookings
The previous steps just activated the Auto-Pay option for your company. Now you have to tell BOS which musicians and for which gigs you want to use Auto-Pay.
Open any existing booking and go to the Finances tab. Provided you have musicians booked for this gig, you will see a list of names and the amounts you owe everyone. Now that you have activated Auto-Pay, you will see a new column of checkboxes called "Auto-Pay".
You can click each checkbox to activate Auto-Pay for that musician or click "Check All" to check all the boxes at once.
NOTE: If any musician has not entered their PayPal email address inside their personal profile, you will not be able to pay them with PayPal. Contact that memmber and let them know they need to update their personal profile and input their PayPal email address.
Disabling Auto-Pay
You may disable Auto-Pay anytime by unchecking the "Enable Auto-Pay" checkbox under Auto-Pay Master Switch and clicking "Update Details". This action will remove the auto-pay checkboxes from booking pages mentioned above and will cancel all future automatic payouts.
PayPal Fees For Paying Musicians
Not to fret! The fees associated with paying your musicians via Auto-Pay, or manually using the Pay button under the Finances Tab inside individual bookings, are so small, you won’t even notice them!
NOTE: Musicians DO NOT pay any fees whatsoever to RECEIVE your payouts. In BOS, if a bandleader pays a musician $200, the musician will receive $200.
In case you care to know, Back On Stage is integrated with the PayPal Payouts API. As such, fees for sending payouts are reduced to nearly nothing.
For example, in 2020, the fee for a bandleader in Canada to pay a musician in Canada via Back On Stage, is a whopping $0.32! That’s less than the cost of most business cheques, and is lower than most individual transaction fees at financial institutions!
Here’s a chart we made to paint a bigger picture:
|
Bandleader Location |
Musician Location |
PayPal Fee Per Payout |
Number of Musicians in Band |
Total Fees for 1 Gig |
|
Canada |
Canada |
$0.32 CAD |
10 |
$3.20 |
|
United States |
United States |
$0.25 USD |
10 |
$2.50 |
You couldn’t hire a secretary to write 10 paychecks and deliver them to all your musicians for you, do all the bookkeeping, and file the invoices for just $2.50 USD...so this solution really is a no brainer!
PayPal fees in Canada and PayPal fees in the United States vary slightly for the PayPal Payouts and Mass Pay service that Back On Stage uses, but both are very reasonable. That’s why we chose PayPal to handle our payouts.
Please note that Back On Stage never takes any fees, commissions or markups of any kind on any money you move using our software. Whether you are accepting client payments or paying your musicians, your transactions are between you and PayPal only, we don’t touch your money!
Auto-Book Preferences
Do you remember all the hours you had to spend on emails, phone calls and text messages just to get your musicians to answer whether or not they are available for a gig?
Well, you can say goodbye to that, because the Auto-Book function here will save you hours of labor. You will never have to wrangle musicians yourself again!
Simply put, the Auto-Book feature is a follow-up system that continually contacts your musicians at an interval you set, until they either accept or decline your gig offer. You can change these settings on a per-gig basis, but here, you customize the default settings so that you can avoid fiddling with the settings each time you need to book musicians.

When you edit your Auto-Book preferences, you set these three parameters:
- Send gig offers every __ hours - choose the interval at which you would like the system to send email gig offers to your required musicians
- Require a response within __ hours - this is the time limit that you give each musician to accept or decline. If they don’t reply within this time, they automatically decline
- Send a final offer __ minutes before the dealine - set the number of minutes before the deadline that you’d like to send a final offer. This is identical to the previous offer emails, but just serves as a final prod to get your musicians to reply
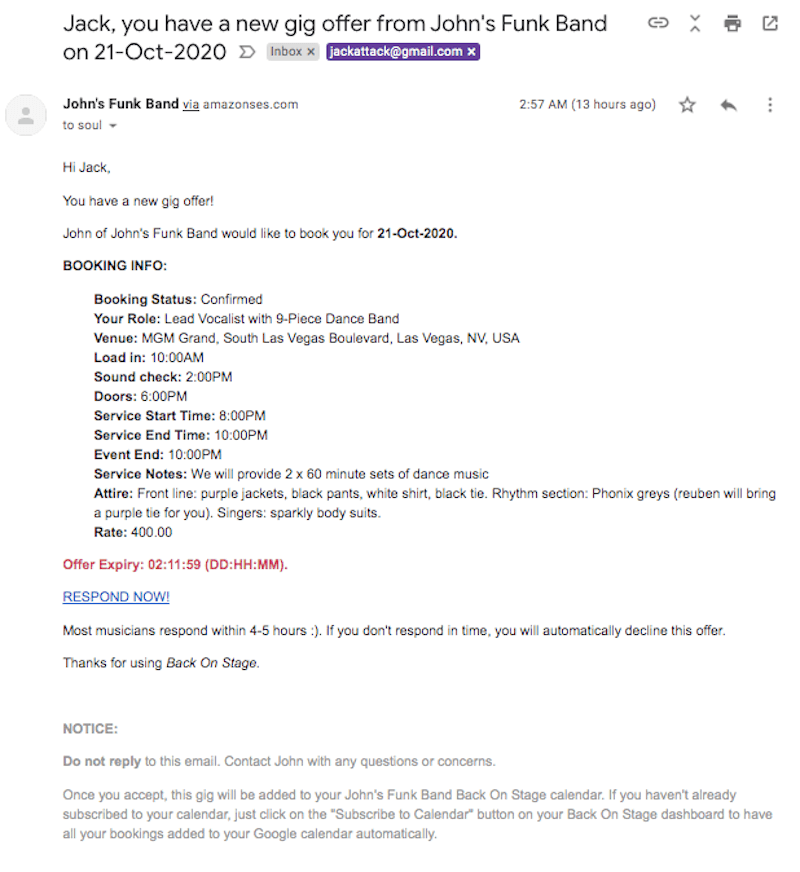
The Auto-Book message ("Gig Offer") that is sent to musicians will look like this:
Conclusion
Now that you have completely set up your company, you can book gigs with ease and save loads of time while doing it!